A Second Game of British Grenadier

>> Monday 30 March 2009

On Saturday 28th March we got together for our second game of BG at the club. After the last game we'd decided to scale down the size of units. The 36-40 fig units were proving just too powerful, especially the militia. So I painted up another couple of American brigade commanders and we put together a force of 4 American brigades v. 3 British. Again, the Americans were on the defensive and as this time we had 5 players we opted for a bigger table setup. Ian had not brought his roads so these were just laid out with fences, and annoyingly I had failed to pack my markers while battling with a three year old just before leaving!

So here is the opening setup:


The Americans again deployed along the fence lines. You can see the militia brigade to the right with the New York and Maryland Continental behind. Along side the militia were the Virginia Continentals and to the left, set back, were Lee's Legion and the massed American cavalry.

The British marched on table in column. On the left, the elite brigade of Lights and Grenadiers head for the small town, Tarleton and his Legion, with the 42nd and some South Carolina militia advanced to threaten and tie up the militia, The remaining brigade was off marching round the left flank.

On the right the militia and Continentals await developments:


The British forge ahead on the left and center...


...while on the right the Legion cavalry and militia pause to decide how to deal with the militia in the farm and riflemen in the woods.


Meanwhile, on the left the British elites surge towards the town:


Finally, on the far left after a worrying delay, the British flank attack appears:


The 71st, von Bose, 17th Dragoons, DeLancey's and Jaegers march towards the American lines.

The elites finally begin to deploy on the edge of the town, ready to push the flank of the Virginians:


Who, realising the threat await orders from the CinC. These don't arrive so the brigade commanders tries to use his initiative. Unfortunately the troops are spooked and begin to retire as the Grenadiers surge forward and the 42nd deploy and advance:


But next turn the CinC restores order and the Continentals form a new line along the next fences and begin to pour fire into the advancing 42nd causing much disruption and a few casualties:


On the far left as the British flank march slows through woods the American cavalry and Lee's Legion move to the counterattack:


And only the 71st and Jaegers are ready to face the threat:


As can be seen from the overview, the American lines still look formidable but the elites have yet to engage:


Scrambling across the fences the 42nd struggle and the Grenadiers begin to take casualties as the massed Virginians pour a devastating fire into them.
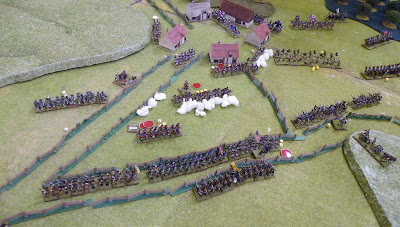

On the far left the flank attack finally emerges from the woods to be faced by large numbers of American cavalry bearing down on them:


As more of the elites deploy to the attack the 42nd are finally forces to retreat under heavy fire and the CinC watches their attack falter:
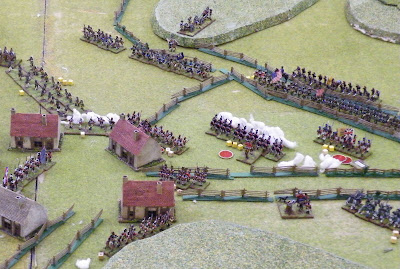

And back on the right, having driven the militia from the farm, the South Carolina militia trade ineffectual shots with the riflemen as the Legion cavalry continue to threaten and take fire from the main militia line. Only the small Light Infantry contingent causing some casualties.

And yet again....we ran out of time. Things were not looking good for the British. The flank attack was about to face its own attack before fully deployed. The elites, although yet to fully engage were struggling over the fences and taking heavy fire before being able to dress ranks for an assault. The Virginians were still steady and the New York and Maryland brigade was about to re-deploy and bring overwhelming odds against the British attack. Maybe we should have added the last couple of Line units I had to the British OOB, maybe the fences had too adverse an affect on the elites attack.

We still felt that the larger units, we had a couple of Continentals at 28 figures were too powerful under the rules. Looking at the scenarios we saw that most units were in the range 16-24 and we're beginning to think this is the size the rules work best under. Although if you take an average roll of 7 then 2x20 fig units will cause 2x2 casualties and a 40 fig unit will cause 4. However, if you drop down to poor rolls e.g 3 then those 2x20 will have no effect and the 40 will cause 3 casualties!

Next game, as has been suggested elsewhere, will be one of the scenarios. Not sure which yet. Either way, everyone enjoyed the game and felt that another outing for the rules was due.

Cheers

Andy

Read more...

First British Grenadier Game

>> Sunday 1 March 2009

Saturday 28th February 2009 finally saw my first game with British Grenadier and the first proper outing for my American and British AWI armies. I took my camera along to record the event but the photos are more of a record rather than eye candy. As this was out first game, the other guys (Ian and Richard) took the attacking three brigades of British and I took the defending Americans and was to be the rules man for the game as I'd supposedly read them more then the other guys! Got to admit that wasn't the case as I'd probably spent too much time getting Generals, markers ready and rebasing for the game. Still, in the end it went OK.

Setup
We chose a fairly simple setup with the Americans defending the road with a mix of militia and Continentals, Lee's Legion (horse and foot), some rifle armed militia skirmishers and a Continental Regiment holding the hills and woods on the American left, a Continental brigade on the right flank, and a strong Continental reserve waiting on the hills for the inevitable breakthrough. The British had Light Infantry and Hessian skirmishers along with British Legion horse and foot on their right moving through the woods, the 71st, von Bose, Delanceys and 17th Dragoons attacking the center, and converged Lights and Grenadiers and the 42nd tasked with assaulting the American Continentals on the American right. Both the center and left British brigades were on assault orders, the right flank on engage. The Americans, to quote Mad Mel had just to 'hold the line!'

Here's the opening setup...


Opening Moves
On the British right he Legion Horse moved impulsively forwards through the Hessian jaegers as the skirmish line and Legion foot moved forward.


While in the center the 17th moved rapidly to engage the Continentals on the road as the 71st, von Bose and DeLanceys advanced to engage the militia.


While on the left, the elite troops of the converged flank companies and the 42nd moved over low hills to engage the waiting Continentals lining the road fence.


Battle Is Joined

The British Right
As the skirmish line moved through the woods the impetuous British Legion horse declared a charge only for Lee's horse to declare an opportunity charge but their nerve failing them they fell back in disorder through their own skirmishing foot who would now take the brunt of the Legion charge, falling back and pursued as Lee himself rode to try and salvage the flank.


British Center
In the center the 17th Dragoons charged the lone Continental regiment in the road only to see them retire rapidly back along the road, allowing them to rest before turning on the militia riflemen holding the hill against the advancing British Light Infantry skirmishers. Meanwhile, the main assault against the militia line got underway.


As the Hessians and Scots advanced towards the militia they came under heavy fire causing them to pause and dress ranks. Eventually the Hessians charged to the fence line against the weakened righthand militia only to see them stand and then force them back.


British Left
The slow move forward of the Elite troops saw them approach the steady looking Continentals.


As the approached the fences volley after volley was exchanged with the Continentals seeming to have the upper hand as casualties were inflicted on both sides.


Battle Rages

British Right
Eventually the Americans crumble. Lee's horse are driven from the field and the skirmishers scattered. Lee rides to join his last surviving Continental unit which is now advancing in support of the center. But the British a gathering for a flank attack as the Legion foot and skirmishers swing round to threaten the flank of the militia.


British Center
The 71st move up to the attack as well as the recovered von Bose as the CinC steps in to drive them forward again. Move withering volleys from the militia as they start to take casualties but the 71st push forward despite losing 25% casualties and matters start to look worrying for the militia as they start to take fire from the flank and face another charge by the combined regiments and the weakened DeLanceys.


However, to their rear the fresh Continental reserves move down off the hill to support and counterattack.

British Left
The Grenadiers and Lights finally push home the attack although the 42nd take another heavy round of volleys from the Virginia Continentals, stalling them.


As the Grenadiers push home with the bayonet this proves too much for Sherburne's Additionals who fall back through the fields. The center Virginia Continentals also flee when the Light Companies push home the attack, falling back even further to the advancing reserves. The remaining Virginians continue to hammer the advancing 42nd who have by now suffered 20% casualties. But the Continentals now look isolated with elite troops now on their flank.


End Game
Now, after 7 turns we ran out of time. As the final view shows, the strong American reserve is moving up, the militia look unlikely to hold much longer, especially with the approaching British on their flank, although they have subjected the 71st to a lesson in musketry. The British Left looks to be an interesting situation. Can the British force back the remaining Continentals from the road and do they then take up that position to await the counterattack?


We'll never know...

Conclusions
It was a good game and although we were not 100% on the rules most things seemed to make sense (I'll be posting my queries on the rules on the British Grenadier Forums and in the next post here) and we enjoyed it - which is half the battle! We did have some concerns on the effectiveness of musketry. As most of my units are done at 1:10 I have some quite large ones with some having 40 figs. These units seemed to be able to inflict heavy casualties even when rolling low e.g. 40 figs rolling a final 4 does 3 casualties. Two 20 fig units rolling the same do nothing. We think this may be down to just my larger units. A look through the scenario books showed militia in 20-24 figure units even at 1:10 so maybe I need to rethink my brigade organisations. More on this later.

So all in all, a damn good game. We're looking forward to trying them again.

Read more...

  © Blogger templates Inspiration by Ourblogtemplates.com 2008

Back to TOP